Creating a Page
Prerequisite Topics
Like posts, a page is a way of adding content to your site. Pages are typically used for non-chronological content or content that presents information that is considered permanent, or relevant regardless of time. Some examples of pages would be an “About” page or a “Contact Us” page. To learn more about the difference between posts and pages, check out our article, Posts vs Pages.
There are two ways you can create a page in WordPress. First, you must begin by logging in, so that you can access your site’s dashboard and the admin toolbar.
Method 1
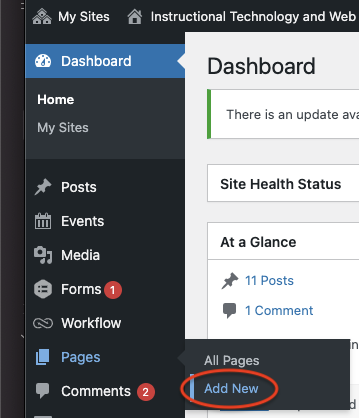
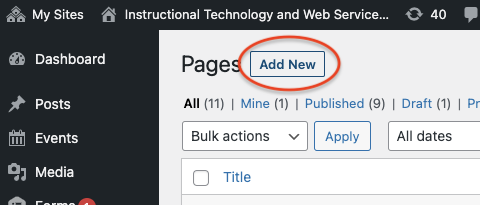
Go to the dashboard of your site. In the sidebar, hover over the Pages tab. You can either select Add New in the submenu, or you can click on the Pages tab and press the Add New button at the top of the page.


This will direct you to the Add New Page screen.
Method 2
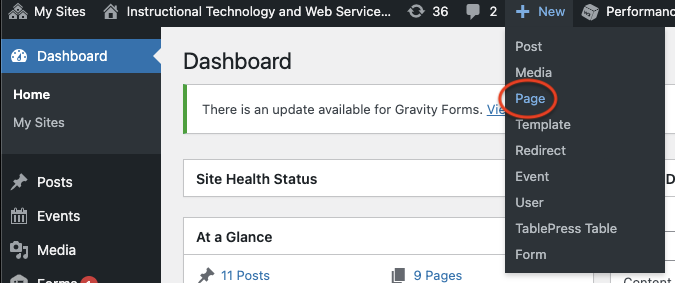
While logged in, the admin toolbar will be present no matter where you are on your site, including the dashboard. In the admin toolbar, there is an option called New. When you hover over New, a dropdown will appear, and you can select Page from the options.

This will direct you to the Add New Page screen.
Add Title and Content

Once you are on the Add New Page screen, the first thing to do is to give your new page a title. This will auto-generate a permalink or your page’s URL. The permalink will not update automatically if you change your page’s title, but you can press the Edit button next to it to change it manually.
Next, add content to your page using the WordPress text editor. With the text editor, you can add and format text, use the Add Media button to add photos, videos, or other forms of media, and use the Add Form button to add an existing Gravity Form.
If you have the Page Builder plugin activated, you can use that to add content instead of the WordPress editor. To launch Page Builder for a page, simply press the Page Builder tab. For more information about using Page Builder, see the Page Builder category in our Knowledge Base. If you do not have the Page Builder plugin, you can request it here.
Creating Subpages
You can have subpages within your pages, which creates a hierarchy of pages. For example, under a page called “Dogs," I could also create subpages for German Shepherds, Yorkshire Terriers, and Pugs.
When your pages are shown in a listing, such as a sitemap, subpages will be nested under their parent pages. The hierarchy of pages and subpages will also show in the URL. For example, the Pugs page might have a URL of https://mysite.com/dogs/pugs.

To make a page a subpage, click the dropdown labeled Parent under the Page Attributes section. This drop-down will list all the pages already created on your site. Select the page you want to be the parent—that would be the Dogs page in our example. By selecting a parent page, you have made the page you are currently editing a subpage.
You can add content as usual, and then publish when you are ready.
Publishing Your Page

The settings for saving and publishing your page can be found in the Publish section on the right side of your screen. With the Save Draft button, you can save your page as a draft that will not yet be visible on your website; you can preview your page with the Preview button.
At any time, you can change the status of your page with the Status drop-down. It will show whether your page is a draft, pending review, or published. If your page is published, you can use this drop-down to unpublish it by changing it back to a draft.
You can also choose visibility settings. By default, pages will be set to public, but you can make them password protected or private. However, in most cases, it is best to keep a page set as public.
After you save your page as a draft or publish your page, a section called Revisions will appear in this box. If you browse your revisions, you can see all versions of the page, with the changes from version to version highlighted. You can also choose to roll your page back to a previous version.
You can also set when to publish your page. By default, it will be published and visible on your site immediately after hitting the publish button. If you want, you can instead choose a specific date and time for the page to publish automatically.
Finally, to publish your page, press the Publish button. Now anyone can view your page if they have your page’s URL. If you want your page to be easily accessible, be sure to add it to your site’s main menu.
To edit existing pages, see our next article: Editing a Post or Page.