Export iMovie for Mac File as MP4
(from Apple Support documentation)
Select a movie, trailer, or clip in the browser.
-
Click the Share button in the toolbar (upper right corner), and then click File.

-
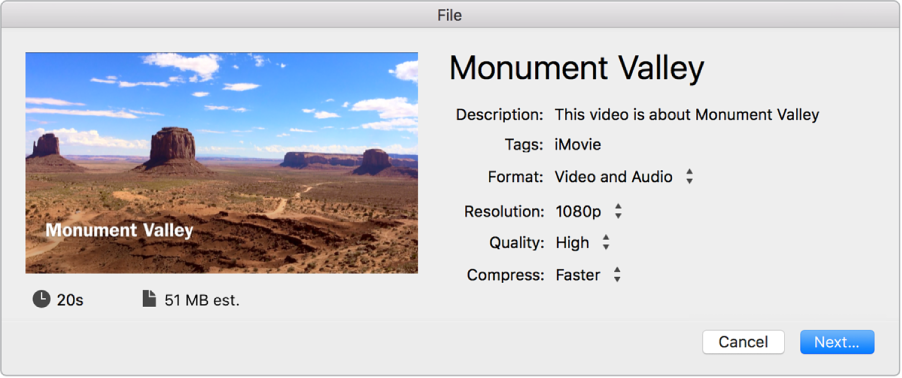
In the dialog that appears, do any of the following:
Set the title of the shared movie: Click the name at the top, and type a new name.
Set the description of the shared movie: Click in the Description field, and type new text.
-
Set the output format of the shared movie: Click the Format pop-up menu and choose an option.
You can choose to export video and audio, or just audio.
Set tags for the shared movie: Click in the Tags field, and type tag names separated by commas.
-
Set the resolution of the shared movie: Click the Resolution pop-up menu and choose an option.
Unavailable resolutions appear dimmed.
Note: You can export a 4K clip or movie in its native resolution.
-
Set the output quality of the shared movie: Click the Quality pop-up menu and choose an option.
To manually set the output quality of the shared movie, click the Quality pop-up menu, choose Custom, and drag the slider to set the target bit rate.
As you drag the slider, the estimated file size that appears below the preview thumbnail is updated.
Choose a compression setting: Click the Compress pop-up menu and choose an option.
Add your movie to the Theater: Select the Add to Theater checkbox.
Click Next.
In the dialog that appears, type a name in the Save As field, or leave the default name, which is the name of the movie, trailer, or clip.
-
Navigate to the location where you want to save the file, and click Save.
A progress indicator appears on the right side of the toolbar. Click the progress indicator to see details. The indicator disappears when the operation has finished.

After the share process is complete, the movie opens in QuickTime Player. A “Share Successful” notification also appears.